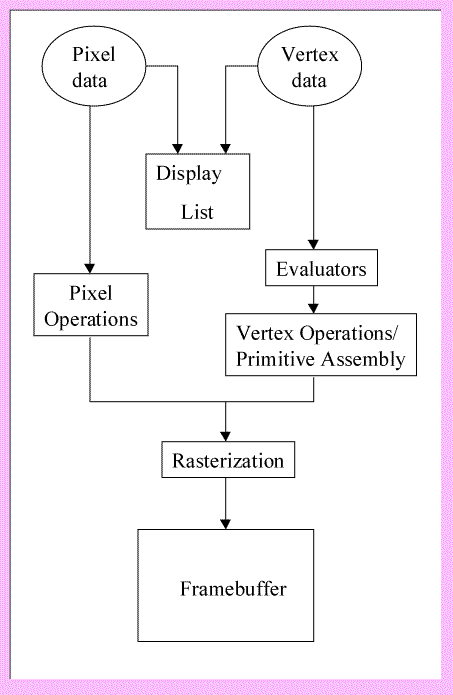
Rendering Pipeline
Most implementations of OpenGL have a similar order of operations, a series of processing stages called the OpenGL rendering pipeline. Although this is not a strict rule of how OpenGL is implemented, it provides a reliable guide for predicting what OpenGL will do. Geometric data (verices, line, and polygons) follow a path through the row of boxes that includes evaluators and per-vertex operations, while pixel data (pixels, images and bitmaps) are treated differently for part of the process. Both types of data undergo the same final step (raterization) before the final pixel data is written to the framebuffer.
|
Display Lists: All data, whether it describes geometry or pixels, can be saved in a display list for current or later use. (The alternative to retaining data in a display list is processing the data immediately-known as immediate mode.) When a display list is executed, the retained data is sent from the display list just as if it were sent by the application in immediate mode. Evaluators: All geometric primitives are eventually described by vertices. Evaluators provide a method for deviving the vertices used to represent the surface from the control points. The method is a polynomial mapping, which can produce surface normal, colors, and spatial coordinate values from the control points. Per-Vertex and Primitive Assembly: For vertex data, the next step converts the vertices into primitives. Some types of vertex data are transformed by 4x4 floating-point matrices. Spatial coordinates are projected from a position in the 3D world to a position on your screen. In some cases, this is followed by perspective division, which makes distant geometric objects appear smaller than closer objects. Then viewport and depth operations are applied. The results at this point are geometric primitives, which are transformed with related color and depth vlaues and guidelines for the rasterization step. Pixel Operations: While geometric data takes one path through the OpenGL rendering papeline, pixel data takes a different route. Pixels from an array in system memory are first unpacked form one of a variety of formats into the proper number of components. Next the data is scaled, biased, processed by a pixel map, and sent to the rasterization step. | 
|
Rasterization: Rasterization is the conversion of both geometric and pixel data into fragments. Each fragment square corresponds to a pixel in the framebuffer. Line width, point size, shading model, and coverage calculations to support antialiasing are taken ito consideration as vertices are connected into lines or the interior pixels are calculated for a filled polygon. Color and depth values are assigned for each fragment square. The processed fragment is then drawn into the appropriate buffer, where it has finally advanced to be a pixel and achieved its final resting place.
Libraries OpenGL provides a powerful but primitive set of rendering command, and all higher-level drawing must be done in terms of these commands. There are several libraries that allow you to simplify your programming tasks, including the following:
Include Files For all OpenGL applications, you want to include the gl.h header file in every file. Almost all OpenGL applications use GLU, the aforementioned OpenGL Utility Library, which also requires inclusion of the glu.h header file. So almost every OpenGL source file begins with:
#include <GL/gl.h> If you are using the OpenGL Utility Toolkit (GLUT) for managing your window manager tasks, you should include:
#include <GL/glut.h>
Note that glut.h guarantees that gl.h and glu.h are properly included for you so including these three files is redundant. To make your GLUT programs portable, include glut.h and do not include gl.h or glu.h explicitly.
Setting Up Compilers Installing GLUT
Compiling OpenGL/GLUT Programs
Makefile:
#include <GL/glu.h>
# insert the name of your source file here (omit the .c)
TARGET = progname

LIBS = -lglut -lGLU -lGL -lXmu -lXext -lXi -lX11 -lm

CC = /usr/gnu/bin/gcc

default: $(TARGET)

all: default

.c.o:
	$(CC) -c $<

$(TARGET): $$@.o
	$(CC) $@.o -Wall $(LIBS) -o $@

clean:
	-rm -f *.o $(TARGET)
The bulk of this tutorial was taken from the OpenGL Programming Guide (Third Edition), The Official Guide to Learning OpenGL, Version 1.2 by Mason Woo, Jackie Neider, Tom Davis and Dave Shreiner, Silicon Graphics 1999. This tutorial was written by Lori L. DeLooze for a student project in Computer Graphics CS 580, taught by Dr. Sudhanshu Kumar Semwal, at the University of Colorado at Colorado Springs.
Main Menu
Back to Top
Next